Wednesday, November 30, 2016

Wine label Card

I was staring at this label on the wine bottle at dinner the other night, so I brought the bottle home and soaked the label off. To make this card, I scanned the label, printed it out and distressed the edges, and created this card around it. I enhanced the design on the label with my copics.


This is my entry to the #109 color challenge at Markerpop. I've included all 5 colors.  The wineglass and grape  stamps are from Heartfelt creations and the greetings are from Your Next Stamp. Images are stamped with Memento Tuxedo black and colored with copics in E50, E51, YR30, YG61, BG93,R59, and 0. Background papers are from Paper House. 

Thanks for looking!

Thursday, November 24, 2016

Bike Journey

While in the Netherlands, my husband and older son took a long bike ride to this castle. 36 km each way with a huge headwind on the return. My son had never ridden anywhere near this far before and it was more about the journey than the castle.


I used this sketch from Stuck?! Papers and inks are from Quick Quotes, stamps from Unity.

Monday, November 21, 2016

Bike Utrecht

As I mentioned in a previous post, my husband went on Sabbatical to Utrecht Netherlands. He and our older son went first. On their first day, they bought used bicycles to get around. The upper photo shows them riding on our street and the lower photos show where they locked the bikes behind the apartment.

This is my entry to the November Tear-it-up challenge at Quick Quotes. I tore the bottom of the chevron paper. Most of the product on this layout is from the Quick Quotes Baggage Claim collection and edges are inked with their wonderful Powderpuff inks in coal miner and sunset. I used sketch #166 from sketch-n-scrap.

Thanks for looking!

Thursday, November 17, 2016

Destination: Utrecht

My husband took a Sabbatical in Utrecht, Netherlands. He left with our older son and then the other 2 of us followed a couple weeks later. This page shows them heading into the airport when I dropped them off and then in front of the apartment on their first day.


I used sketch #117 from sketch-n-scrap.  Papers are Basic Grey Carte postale and Graphic 45 Come Away with Me.

Thanks for looking!

Tuesday, November 15, 2016

Thanks is for Giving

My parents always spend Thanksgiving with my sister on the West Coast while I spend it here in the East with my in-laws. I like to send them a card out there.


This card is my submission to the Give Thanks challenge at Markerpop which can be found here. I stamped and colored the leaves on the background paper as follows: the orange maple leave leaves were stamped with Memento Morocco ink and colored with Copic markers  YR02 and YR000. The brown leaves are stamped with Memento Rich Cocoa and colored with Copic markers E23 and E25. Finally, the green leaves are stamped with Nick Bantock Chartreuse Leaf and colored with Copic YG03 and YG61.  All stamps are Hero Arts, sweater paper is Simple Stories and the greeting is Basic Grey. 


Monday, November 14, 2016

Mitzvah Trip

The word Mitzvah means commandment, and can also be used to refer to a good deed. For my Son's Bar Mitzvah, we traveled to Israel where we volunteered with Leket, the Israeli food bank and food rescue organization. One of the places we volunteered with Leket was in an overgrown field harvesting Leeks that would otherwise go to waste. Leket then distributes the food to food banks and poor people who wouldn't otherwise get fresh produce. Here is a page I made about Leket. I used the color scheme from color challenge #52 at Your Next Stamp which can be found here. I used YNS stamps for the little flower in the lower right and the mushroom in the lower left. Papers are Basic Grey Offbeat collection.


While we were in Israel, we also spent time relaxing in Tel Aviv and touring in Jerusalem. I made this double page for my son's Bar Mitzvah album with photos of him at famous sites in Jerusalem.  I used this sketch from Let's Scrap. Papers are from Heidi Swapp No Limits collection.


These 2 pages will both go in his Bar Mitzvah album. Thanks for looking!

Tuesday, November 1, 2016

Paper Leaf Tutorial

Although  there are a wide variety of leaf embellishments available on the market, I love to make my own. It is very easy and saves money. 


I have leaf stamps which I use to make these leaves. However, these instructions could be modified to use die-cut leaves or leaves fussy cut from patterned paper. If you are not coloring your leaves, then you can jump down to the part where I fussy cut the leaf. 

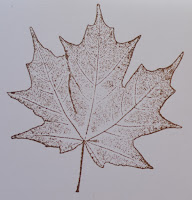
I start by stamping the image onto my paper. It's best to use an ink that doesn't bleed in water and relatively flimsy cardstock.  Since I plan to color them, I choose some markers which are appropriate for leaves, in this case fall leaves. 


I decided to stamp my leaves with brown ink to coordinate with the leaf, but black would work too.  For this maple leaf, I chose to use 3 shades of yellow and a blender. I color dark to light so I made the inside of my leaf dark shading out to a lighter color near the edges. Leaves with darker edges shading to a lighter center also look realistic, so there are plenty choices for coloring. I start with my darkest shade and just color some of the middle of the leaf. Next I take one shade lighter and color further towards the edges. My strokes with this marker go over the color from the darker marker to blend. I continue coloring in this manner with all my shades, in this case 3, until the leaf is completely covered. Then I use my colorless blender over all the other colors from the inside towards the edge. I continue using the colorless blender until I like how the colors are blended. If you don't have markers, you can color the leaf with colored pencils, watercolors, or ink and a waterbrush. Leaves are not perfect in nature and the coloring doesn't need to be perfect either. 


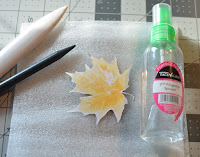
Once I am satisfied with the look of the leaf, I fussy cut it out. I don't wait for the markers to dry, I'm just careful with the damp paper. Once the leaf is fussy cut, I put it upside-down on something soft (like the palm of my hand or a foam mat). 


Now is time to shape the leaf. First, I lightly squirt the back of the leaf with the water. Then I play with it to form the shape. I don't have a fancy stylus so I just use anything plastic with a rounded tip I can find, such as a bone folder (plastic knives and spoons would work also). I gently poke the back of the  wet leaf with a rounded tool on the back just inside the edges to make the edges curl

Next I turn the leaf right-side up and fold along the veins. Sometimes I poke in the middle a bit as well. Typically, I flip the leaf over a couple of time poking and folding until I have the desired shape. You might need to squirt more water on the front, but be careful as too much water will make the leaf tear.


Then I let the leaf dry until it can maintain its shape and be handled.  I can adhere it to my page or card using glue dots or foam as I would with any paper flower or leaf. 


Leaf supply list:
Generic white card stock
Hero Arts stamp
Memento ink Rich Cocoa
Copic markers: Y11, Y17, Y21, and colorless blender

Card supply list:
Authentique paper Grateful collection
Simple Stories Sweater Weather collection chipboard and die-cut
Quick Quotes Powder puff ink Mocha Mama

Thanks for stopping by!