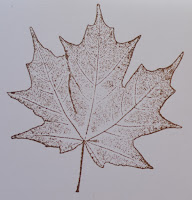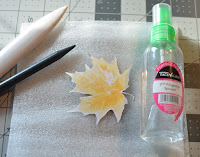
I have leaf stamps which I use to make these leaves. However, these instructions could be modified to use die-cut leaves or leaves fussy cut from patterned paper. If you are not coloring your leaves, then you can jump down to the part where I fussy cut the leaf.
I start by stamping the image onto my paper. It's best to use an ink that doesn't bleed in water and relatively flimsy cardstock. Since I plan to color them, I choose some markers which are appropriate for leaves, in this case fall leaves.
 I decided to stamp my leaves with brown ink to coordinate with the leaf, but black would work too. For this maple leaf, I chose to use 3 shades of yellow and a blender. I color dark to light so I made the inside of my leaf dark shading out to a lighter color near the edges. Leaves with darker edges shading to a lighter center also look realistic, so there are plenty choices for coloring. I start with my darkest shade and just color some of the middle of the leaf. Next I take one shade lighter and color further towards the edges. My strokes with this marker go over the color from the darker marker to blend. I continue coloring in this manner with all my shades, in this case 3, until the leaf is completely covered. Then I use my colorless blender over all the other colors from the inside towards the edge. I continue using the colorless blender until I like how the colors are blended. If you don't have markers, you can color the leaf with colored pencils, watercolors, or ink and a waterbrush. Leaves are not perfect in nature and the coloring doesn't need to be perfect either.
Once I am satisfied with the look of the leaf, I fussy cut it out. I don't wait for the markers to dry, I'm just careful with the damp paper. Once the leaf is fussy cut, I put it upside-down on something soft (like the palm of my hand or a foam mat).
Now is time to shape the leaf. First, I lightly squirt the back of the leaf with the water. Then I play with it to form the shape. I don't have a fancy stylus so I just use anything plastic with a rounded tip I can find, such as a bone folder (plastic knives and spoons would work also). I gently poke the back of the wet leaf with a rounded tool on the back just inside the edges to make the edges curl
Then I let the leaf dry until it can maintain its shape and be handled. I can adhere it to my page or card using glue dots or foam as I would with any paper flower or leaf.
Leaf supply list:
Generic white card stock
Hero Arts stamp
Memento ink Rich Cocoa
Copic markers: Y11, Y17, Y21, and colorless blender
Card supply list:
Authentique paper Grateful collection
Simple Stories Sweater Weather collection chipboard and die-cut
Quick Quotes Powder puff ink Mocha Mama


No comments:
Post a Comment