Monday, August 27, 2018

Sunny Days with Louise!

Good morning Quick Quotes readers! I hope you all had a great summer. Louise here on the blog with a couple of scrapbook pages about my summer vacation that I made using this month's amazing Club Q kit.


We were on vacation at a lake and my teenagers decided we should rent both a pedal boat and a paddle board at the same time and bring a frisbee into the lake. It was wonderful to see my teenagers having simple fun with smiles on their faces, and even including us in the fun.  I had my phone on the pedal boat and was able to snap some pictures.

The Club Q kit contains so many beautiful papers and embellishments and everything goes together perfectly, so it was very easy to create these pages. I didn't even need to cut a single piece of paper and the only thing that I added was PowderPuff Chalk Ink.

The highlight of this page is the big sun. It came pre-cut in the kit. All I did was ink the edges with PowderPuff Chalk ink in Sandy Shore and adhere it to the page.


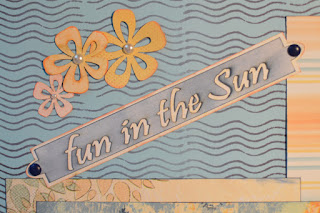
The title is made from 2 pieces of white chipboard that were included in the kit:
  • I used my ink blending tool to apply PowderPuff Chalk ink in Deep Sea.
  • I added extra ink directly to the edges. 
  • I layered the title over the light orange print and attached the chipboard frame with orange brads. 
  • I decide to leave the frame white, but added a small bit of PowderPuff Chalk ink in Sandy Shore to the edges.


I decided to use little circles as embellishments because they resemble the frisbee. I used a different type center in each one (brad, pearl, and flower) and inked the edges in a coordinating color of PowderPuff Chalk ink (Bermuda, Key largo, and Sandy Shore).

Even though I have more photos from the same outing, I decided to create 2 separate scrapbook pages instead of a 2-page spread.  Here is the second page I created using the same colors and techniques as described above.


On this page, I used the round "frisbee" embellishments along the edge of my journaling block.

I had so much fun creating these pages with the beautiful papers in this kit. I hope I have given you some ideas for scrapping your own sunny day photos.

Quick Quotes Products:
August Club Q
PowderPuff Chalk Inks: Bermuda, Deep Sea, Key Largo, Sandy Shore

Other Products:
Ink blending tool from Ranger
Journaling pen from Creative Memories

Thanks for stopping by!
~Louise


Thursday, August 16, 2018

Sunflowers

I love sunflowers, they are so cheerful and beautiful - but they are difficult to color.

I made this sunflower card using Sunny Harvest stamp set from Powerpoppy, Copic marker, Black Olive ink from Your Nest stamp, and Graphic 45 French Country.


Since the card base in black, I stamped and colored a bit on the inside as well.


This is my entry into the daily marker coloring contest beginner category.  It is also my entry into the Powerpoppy spread a little sunshine challenge which can be found here

I used Your Next Stamp card sketch number 95 which can be found here

Thanks for stopping by!
Louise

Club Q with Louise!

Hello! Louise here sharing a vacation layout I made using this month's amazing Club Q kit.


All of the patterned papers in the Club Q kits have coordinating patterns on the back. This gives you the option  to create the projects according to the instructions or to flip the papers to create a slightly different look. For this page, I combined papers from different parts of the kit, using the front on some and the reverse on others to get a scrapbook page that matched my photos.

I only needed to cut one paper in the kit to make this page. I cut the 11" x 11" square to stretch it across the 2 papers. It looks like the striped paper is stretching behind the vertical strip of photos. If you look at the photo below, you can see that it isn't.


  • Most of the papers are edged with PowderPuff Chalk Ink in Deep Sea. The ink is applied to the edges directly from the pad. You can see in the photo below how the shape of the PowderPuff Inkpad enables it to get into different shapes. 
  • I used my ink blending tool to apply the Deep Sea ink to the chipboard title. 
  • I colored the flowers using several different shapes of PowderPuff Chalk Ink (Island Orange, Peach Tree, Sandy Shore, and Tropical Punch). I colored some with my blending tool and applied the ink directly to others. I thought it would look nice if each flower was slightly different from the others. 


  • I used the pearls from the kit in the centers of the flowers.
  • The title is attached with blue brads that were also in the kit. 


I printed my journaling on white cardstock but I thought the look was too stark, so I lightly applied PowderPuff ink over the journaling using the colors that were leftover on my blending tool. 


To finish the layout, I added a few embellishments from the Navigator 12" x 12" Quotes and Phrases sheet. 

In closing, here is a close-up of the left side:


And here is a close-up of the right:


Quick Quotes Products:
August Club Q
Navigator 12" x 12" Quotes and Phrases
PowderPuff Chalk Ink: Bermuda, Deep Sea, Island Orange, Peach Tree, Sandy Shore, Tropical Punch

Other Products:
Ink blender from Ranger
Generic white cardstock

Thanks for stopping by!
~Louise

Tuesday, August 7, 2018

Dreaming about Sunlight with Louise!

Hello Quick Quotes readers! I hope you are all enjoying summer! Louise here with a layout about a summer outing I took with my sister.


Since one of my photos is of a field of flowers, I decided to create my page with all types of floral elements. I started with the Spring Showers 100 paper which has a floral print around the edge. I then created a variety of flowers to use on my page:

  • The yellow flower in the lower left is fussy cut from a sheet of the same patterned paper and inked with PowderPuff Chalk Ink in Buttercup.
  • The paper flowers which look a bit like sunflowers were from my February Club Q kit. I used my ink blending tool to apply the Buttercup ink to the petals and my waterbrush to apply PowderPuff Chalk Ink in Mahogany to the centers.  
  • The other flowers were die-cut from the Spring Showers 102 and 104 papers. I used my ink blending tool to apply PowderPuff Chalk Ink in Island orange and Buttercup to create the orange and yellow ones. The red and orange ones are edged with PowderPuff Chalk ink in Tropical Punch.
  • I shaped the flowers using my fingers. 

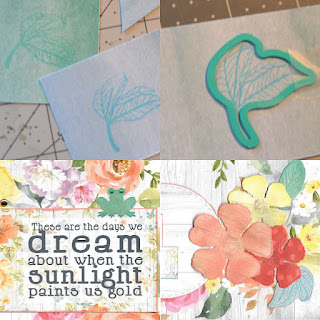
  • Since the background paper had both blue and green leaves, I decided to create additional leaves using stamps and dies with paper scraps from the same collection. The green ones were stamped with PowderPuff Chalk Ink in Key Largo and the blue ones with PowderPuff Chalk Ink in Bermuda. 
  • Since the name of the place had a frog in it, I punched a couple of frogs from the same paper scraps and inked them with PowderPuff Chalk Ink in Key Largo.
  • I die-cut a circle from the Spring Showers 102 and placed it behind my journaling. 
  • After the page was assembled, I decided that the flowers needed centers so I carefully dotted centers using PowderPuff Chalk Ink in Mahogany and my water brush. 

To finish the page, I added some saying from the Farmhouse collection and placed 3 copper brads to create a visual triangle around my photos. 


Quick Quotes Products:
Spring Showers Paper Pack
PowderPuff Chalk Ink: Bermuda, Buttercup, Island Orange, Key Largo, Mahogany, Tropical Punch
February 2018 Club Q
Farmhouse 500
Farmhouse Strip
Brads - Copper

Other Products:
Ink Blending Tool from Ranger
Waterbrush from CTMH
Leaf stamp and die set from Vicki Boutin
Metal dies from Spellbinders and Pink & Main
Frog punch from EK
Enamel accents from Wendy Vecchi

Thanks for stopping by!
~Louise